

Bake It Till You Make It with Easy Homemade Cannabis Chocolates
The Beginner's Guide to Homemade Cannabis Chocolates

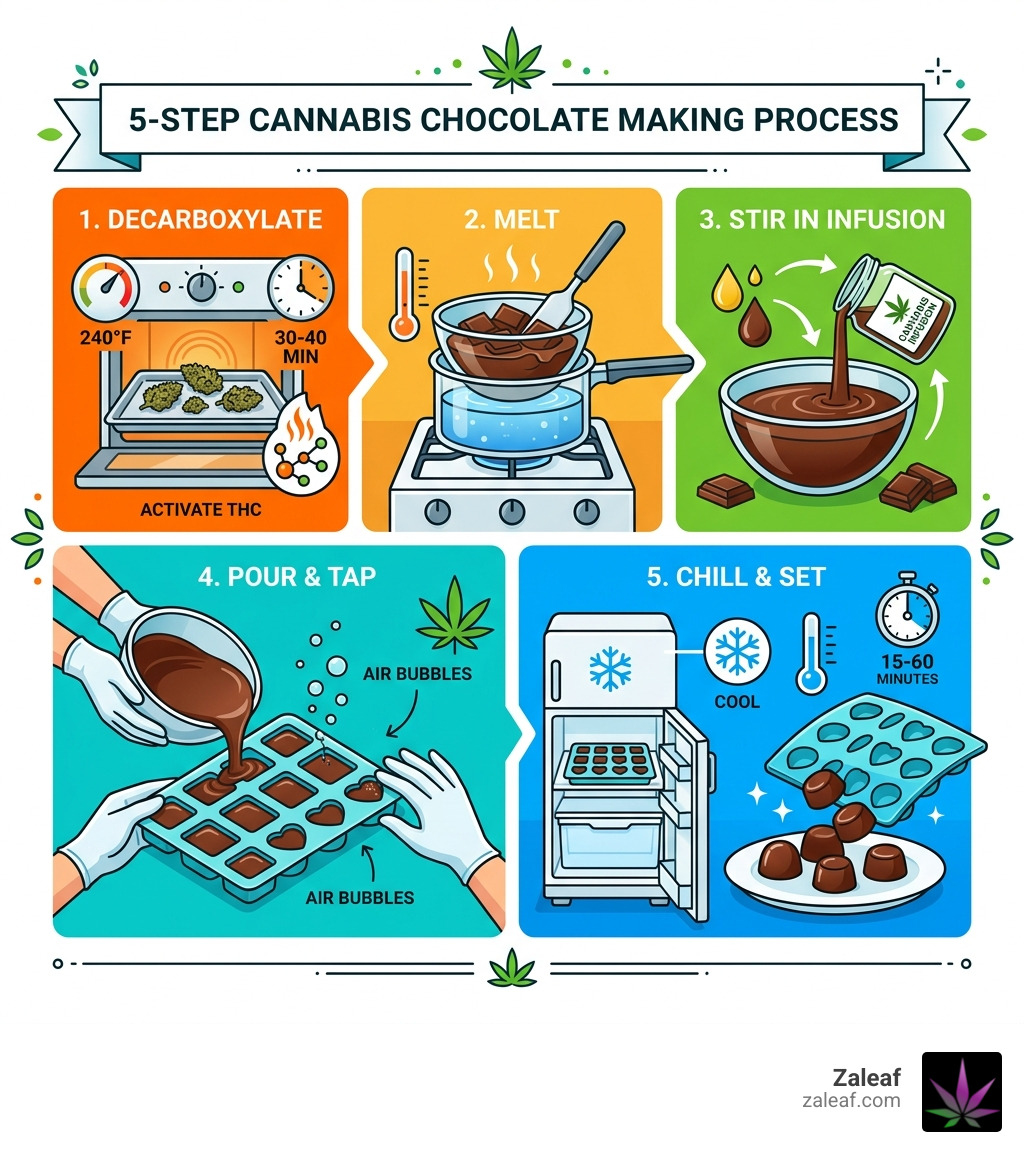
How to make cannabis chocolates is simpler than most people think. Here's a quick overview of the core process:
- Decarboxylate your cannabis at 240°F for 30-40 minutes to activate THC
- Melt high-quality chocolate using a double boiler or microwave
- Stir in your cannabis infusion (oil, butter, tincture, or concentrate)
- Pour into silicone molds and tap out air bubbles
- Chill in the refrigerator for 15-60 minutes until fully set
Chocolate is one of the most forgiving bases for homemade edibles. It masks earthy flavors, absorbs cannabinoids efficiently thanks to its natural fat content, and lets you control exactly how much THC or CBD goes into each piece.
That means no guessing. No inconsistent store-bought batches. Just clean, discreet, precisely dosed treats you made yourself — in under an hour.
Whether you're brand new to edibles or just tired of gummies, homemade cannabis chocolates give you full control over potency, ingredients, and flavor.
I'm Max Shemesh, owner and CEO of Zaleaf, and I've spent years in the cannabinoid industry helping people find smarter, cleaner ways to enjoy cannabis — including learning how to make cannabis chocolates at home. With that background, I'll walk you through everything you need to get it right the first time.
Important how to make cannabis chocolates terms:
Why You Should Learn How to Make Cannabis Chocolates
If you’ve ever wondered why a chocolate edible feels more "rounded" or smoother than a gummy of the same dosage, you’ve stumbled upon one of the best-kept secrets in the cannabis world. It isn't just about the taste; it’s about the science of the "soak."
Cannabinoids like THC and CBD are lipophilic, meaning they are fat-soluble. They need fat to move through your body efficiently. Chocolate, particularly high-quality varieties, is loaded with cocoa butter—a perfect fatty carrier that boosts the bioavailability of cannabinoids. This means your body can absorb the active ingredients more effectively than it would from a sugar-based gummy.
Furthermore, cacao contains a fascinating compound called anandamide. Often referred to as the "bliss molecule," anandamide is a neurotransmitter naturally produced in the human brain that regulates mood and pain. Because it is chemically similar to THC, eating chocolate actually primes your endocannabinoid system, potentially enhancing the euphoric and relaxing effects of your cannabis.
Learning how to make cannabis chocolates also offers practical benefits:
- Consistent Dosing: By making them yourself, you avoid the "hot spots" sometimes found in mass-produced treats.
- Discreet Consumption: A small chocolate square is much more low-profile than smoking or vaping.
- Dietary Control: You choose the sugar content, the quality of the chocolate, and whether to make them vegan or dairy-free.
For a deeper dive into why this pairing is so legendary, check out An Essential Guide To Cannabis Chocolates.
The Science of Potency: Decarboxylation and Dosing
Before you start melting anything, we need to talk about the most critical step: decarboxylation.
Raw cannabis contains THCA and CBDA, which are non-psychoactive. To turn that THCA into the THC that provides the "high" or therapeutic relief you're looking for, you must apply heat. This process removes a carboxyl group from the molecular chain, "activating" the plant.
How to Decarb Like a Pro
- Preheat your oven to 240°F (115°C).
- Coarsely grind your flower (don't turn it into dust, or it will be hard to strain later).
- Spread it evenly on a parchment-lined baking sheet.
- Bake for 30–40 minutes, stirring every 10 minutes to ensure an even toast. The cannabis should look light brown and smell nutty, not burnt.
Once activated, you need to calculate your dose. This is where many home cooks get nervous, but it's just simple math. If you have 1 gram (1,000mg) of flower with 20% THC, you have 200mg of potential THC. After decarb and infusion losses (usually about 20%), you might end up with roughly 160mg of active THC in your butter or oil. If you divide that into 20 chocolates, each piece will have 8mg.
THC Dosage Guide
| Dosage | Experience Level | Expected Effects |
|---|---|---|
| 1–2.5 mg | Microdose / Beginner | Very mild relief, focus, no "high" |
| 2.5–5 mg | Low / Intermediate | Light euphoria, social relaxation |
| 5–10 mg | Moderate | Stronger euphoria, physical relaxation |
| 10–20 mg | Experienced | Potent psychoactive effects, heavy sleep aid |
| 20mg+ | High Tolerance | Intense experience, best for chronic symptoms |
For more on the chemistry of your treats, see our Weed Chocolate Complete Guide.
Essential Ingredients and Equipment for Infused Treats
You don't need a professional pastry kitchen to master how to make cannabis chocolates, but having the right tools makes the process much more enjoyable.
The Ingredients:
- High-Quality Chocolate: Look for "couverture" chocolate. This contains a higher percentage of cocoa butter (at least 31%), which helps it melt smoothly and set with a professional snap. Avoid standard chocolate chips if possible, as they contain stabilizers designed to help them resist melting.
- Your Cannabis Infusion: This is your "magic" ingredient.
- Optional Add-ins: Sea salt, crushed nuts, dried fruit, or even a drop of peppermint extract.
The Equipment:
- Double Boiler: This is the safest way to melt chocolate without burning it. If you don't have one, place a glass or stainless steel bowl over a pot of simmering water (make sure the water doesn't touch the bottom of the bowl).
- Digital Thermometer: Crucial for tempering.
- Silicone Molds: These make it incredibly easy to pop the finished chocolates out without breaking them.
- Spatula: For constant, gentle stirring.

Check out The Sweetest High Mastering Homemade Canna Chocolate for more equipment tips.
Choosing the Best Infusion for Your How to Make Cannabis Chocolates Project
There isn't just one way to get the "green" into the "brown." Depending on what you have on hand, you can choose from several methods:
- Cannabutter or Infused Coconut Oil: The most common method. It provides a rich texture but requires a specific ratio (usually 2 tablespoons of fat per 1 cup of chocolate) to ensure the chocolate still hardens properly. Learn more at From Bud To Bottle Making Cannabis Infused Oil.
- Distillate or Concentrates: The "gold standard" for potency. Since they are already activated and highly concentrated, you only need a tiny amount, which won't affect the flavor or texture of the chocolate.
- Tinctures: If using an alcohol-based tincture, you must evaporate the alcohol first to create FECO (Full Extract Cannabis Oil), or the water/alcohol content will cause your chocolate to "seize" into a clumpy mess.
- Kief: You can stir decarboxylated kief directly into melted chocolate. It’s easier than making butter and offers a smoother texture than using ground flower.
Step-by-Step Guide: How to Make Cannabis Chocolates
Ready to start? Let’s walk through the most popular method using a pre-made infusion like cannabutter or coconut oil.
Step 1: Prep your Molds Make sure your silicone molds are bone-dry. Even a single drop of water can ruin a batch of chocolate. You can lightly spray them with oil, but high-quality silicone usually doesn't need it.
Step 2: The Melting Phase Chop your chocolate into small, uniform pieces. Place 2/3 of the chocolate in your double boiler. Keep the heat low—you want the water to simmer, not boil. Stir constantly. If you're using a microwave, go in 15-second bursts, stirring thoroughly between each.
Step 3: Incorporate the Infusion Once the chocolate is smooth, add your room-temperature cannabis infusion. If you are making something more advanced like cannabis chocolate truffles, you would mix your infusion with heavy cream at this stage. Stir gently but thoroughly for at least 2 minutes to ensure the cannabinoids are evenly distributed.
Step 4: Pour and Level Spoon or pour the mixture into your molds. Once filled, gently tap the molds on the counter. This "burping" process brings air bubbles to the surface, ensuring a smooth, professional finish.
Step 5: The Big Chill Place the molds in the refrigerator for at least 45–60 minutes. If you’re in a hurry, 15–20 minutes in the freezer works, but the fridge provides a more stable set.
Troubleshooting Common Issues When Learning How to Make Cannabis Chocolates
Even experts run into trouble occasionally. Here is how to handle the most common "oops" moments:
- Chocolate Seizing: If your chocolate suddenly turns into a gritty, hard paste, it has likely come into contact with moisture or was overheated. You can sometimes save it by stirring in a teaspoon of coconut oil, but it may never be smooth enough for molds—use it for a "bark" instead.
- Grainy Texture: This usually happens if the chocolate was melted too fast. "Low and slow" is the mantra.
- The "Weedy" Taste: If the herbal flavor is too strong, try using dark chocolate (70% cacao or higher). You can also add sea salt or vanilla extract to help mask the earthiness. For more flavor tips, read Weed In Chocolate.
- Sweating: If your chocolates look like they are perspiring when you take them out of the fridge, it's due to humidity. Let them come to room temperature in a cool, dry area.
Mastering the Finish: Tempering and Storage
If you want that professional "snap" and a glossy sheen, you need to temper your chocolate. Tempering is the process of heating and cooling chocolate to align the crystals in the cocoa butter.
Without tempering, your chocolate might look dull or develop bloom—those harmless but unappealing white streaks. While untempered chocolate is safe to eat and just as potent, tempered chocolate stays firm at room temperature and doesn't melt the second you touch it.
The Quick "Seeding" Method:
- Melt your chocolate to 110°F-115°F (for dark chocolate).
- Remove from heat and stir in the remaining 1/3 of un-melted chocolate "seeds."
- Stir until the temperature drops to 82°F.
- Briefly put it back over the heat until it reaches 88°F-90°F. This is your "working" temperature.
For more on achieving that perfect finish, see our guide on Cannabis Edible Chocolate.
Proper Storage for Potency
Cannabinoids are sensitive to light and heat. To keep your chocolates fresh:
- Airtight is Right: Use a glass jar or a vacuum-sealed bag.
- Cool and Dark: A pantry is fine for a few days, but the refrigerator is better for long-term storage (up to 3 months).
- Freezer: You can freeze cannabis chocolates for up to 6 months. Just wrap them tightly in foil and place them in a freezer bag.
- Label Everything: Always label your containers with the date and the estimated milligrams per piece. Safety first!
Frequently Asked Questions about Cannabis Chocolates
Can I use standard chocolate chips for making edibles?
Yes, you can, but be aware that they often contain soy lecithin and less cocoa butter, which makes them harder to temper. If you use chips, adding a small amount of coconut oil can help them melt more smoothly.
How long does it take for homemade cannabis chocolate to kick in?
Like most edibles, chocolate must pass through the digestive system and be processed by the liver. This typically takes 30 minutes to 2 hours. Never take a second dose until at least two hours have passed!
Why did my chocolate turn white after storage?
This is called "fat bloom." It happens when the chocolate is exposed to temperature fluctuations, causing the cocoa butter to separate and rise to the surface. It is 100% safe to eat and does not affect the potency of the cannabis.
Conclusion
Mastering how to make cannabis chocolates is a rewarding skill that combines culinary art with cannabinoid science. By controlling the process from decarb to tempering, you ensure a clean, potent, and delicious experience every time.
At Zaleaf, we believe in the power of high-quality, lab-tested cannabinoids. Whether you are looking for specific terpene profiles for relaxation or uplifting effects, we provide 100% legal products with discrete shipping and no medical card required. All our products undergo rigorous 3rd party testing to ensure that what you're putting into your homemade treats is pure and effective.
Ready to dive deeper into infusions? Check out Chocolate Edibles 101 A Guide To Cannabis Consumption for more inspiration. Happy "baking"!